Or, a description of the steps behind the making of the costume.

Every year primary school students in Australia celebrate
“Book Week”. This is an opportunity for
children to spend school time meeting authors of children’s books and sharing
favourite books with one another. Sylvie’s
school traditionally ends the week with a dress up day, where students can
dress in a costume relating to the year’s Book Week theme, or dress up as their
most loved book character.
In Sylvie’s case, one her favourite characters is the Gruffalo himself, closely followed by
the cheeky brown mouse. This children’s
book, (written by Julia Donaldson and illustrated by Axel Scheffler) is
both witty and clever, as the little mouse outsmarts all his predators,
including “The Gruffalo”. I can’t recommend
it highly enough.
 |
| Can you see Mr Mouse hiding in the pocket especially crafted for him? |
 |
| Sylvie was very excited! You can see the design allows the child's arms to protrude. |
The costume is divided into three elements; the head
(comprising a ‘hat’), the body (a ‘dress’) and the Gruffalo’s feet.
I won’t be providing any exact measurements; this post will
be describing the process and hopefully some inspiration for you to attempt
something similar.
This was quite a complex project that I began 3 weeks prior
to the Book Week dress up day, I confess to thinking about it for quite a few
more weeks prior to beginning. I had
some problems to solve, I wanted to include all of the features in the Gruffalo’s head, if I had Sylvie’s face
beaming from the centre of a mask I would miss out on the “terrible tusks” and “terrible
teeth in his terrible jaws”, not forgetting his orange eyes, black tongue
and most importantly and completing his revolting ugliness, “a poisonous wart at the end of his nose”.
The reason I think I had lead myself along the path of a
vision or plan that Sylvie’s head would poke out from under the chin of the Gruffalo costume, was perhaps a photo I took (and cannot find now) of Sylvie poking her head through one of the promotional items from the film “Where the wild things are”.
On thinking it through I realised this would mean that the
design would have to incorporate some sort of structure to keep the mask above
her head without toppling off and some very large shoulders would have to be
constructed, too heavy and hot I suspected and so I ruminated further.
It is always in the first minutes on waking in the morning
that if I’m going to find a ‘solve’ to a problem, it will be then. Aha!
Finally I had it! I would make
the mask a ‘hat’, where the top of her skull would sit inside the Gruffalo’s
head and if need be, I could add an elastic strap under Sylvie’s chin to ensure
the mask stayed in place.
To make the mask you
will need:
A copy of ‘The
Gruffalo’ to work from
Scissors (paper/cardboard)
Scissors (fabric)
White gaffer tape
A wine carton (to fit 6 bottles)
Another piece of heavier weight cardboard to form the ‘brim’
interior of the ‘hat’
Lighter weight cardboard to make the ears
Stuffing
3 takeaway foil containers
Calico ripped into strips
PVA glue
White paint and brush
Hot glue gun
Peach felt
Tennis ball
Spray paint in white and pale orange
Acrylic fur (use the cut offs from making the ‘dress’)
Scraps of white fabric for the terrible teeth
A scrap of black fabric for the tongue
Hot glue for the poisonous
wart
3 white pipe cleaners for the whiskers
Pink and green acrylic paint and brush
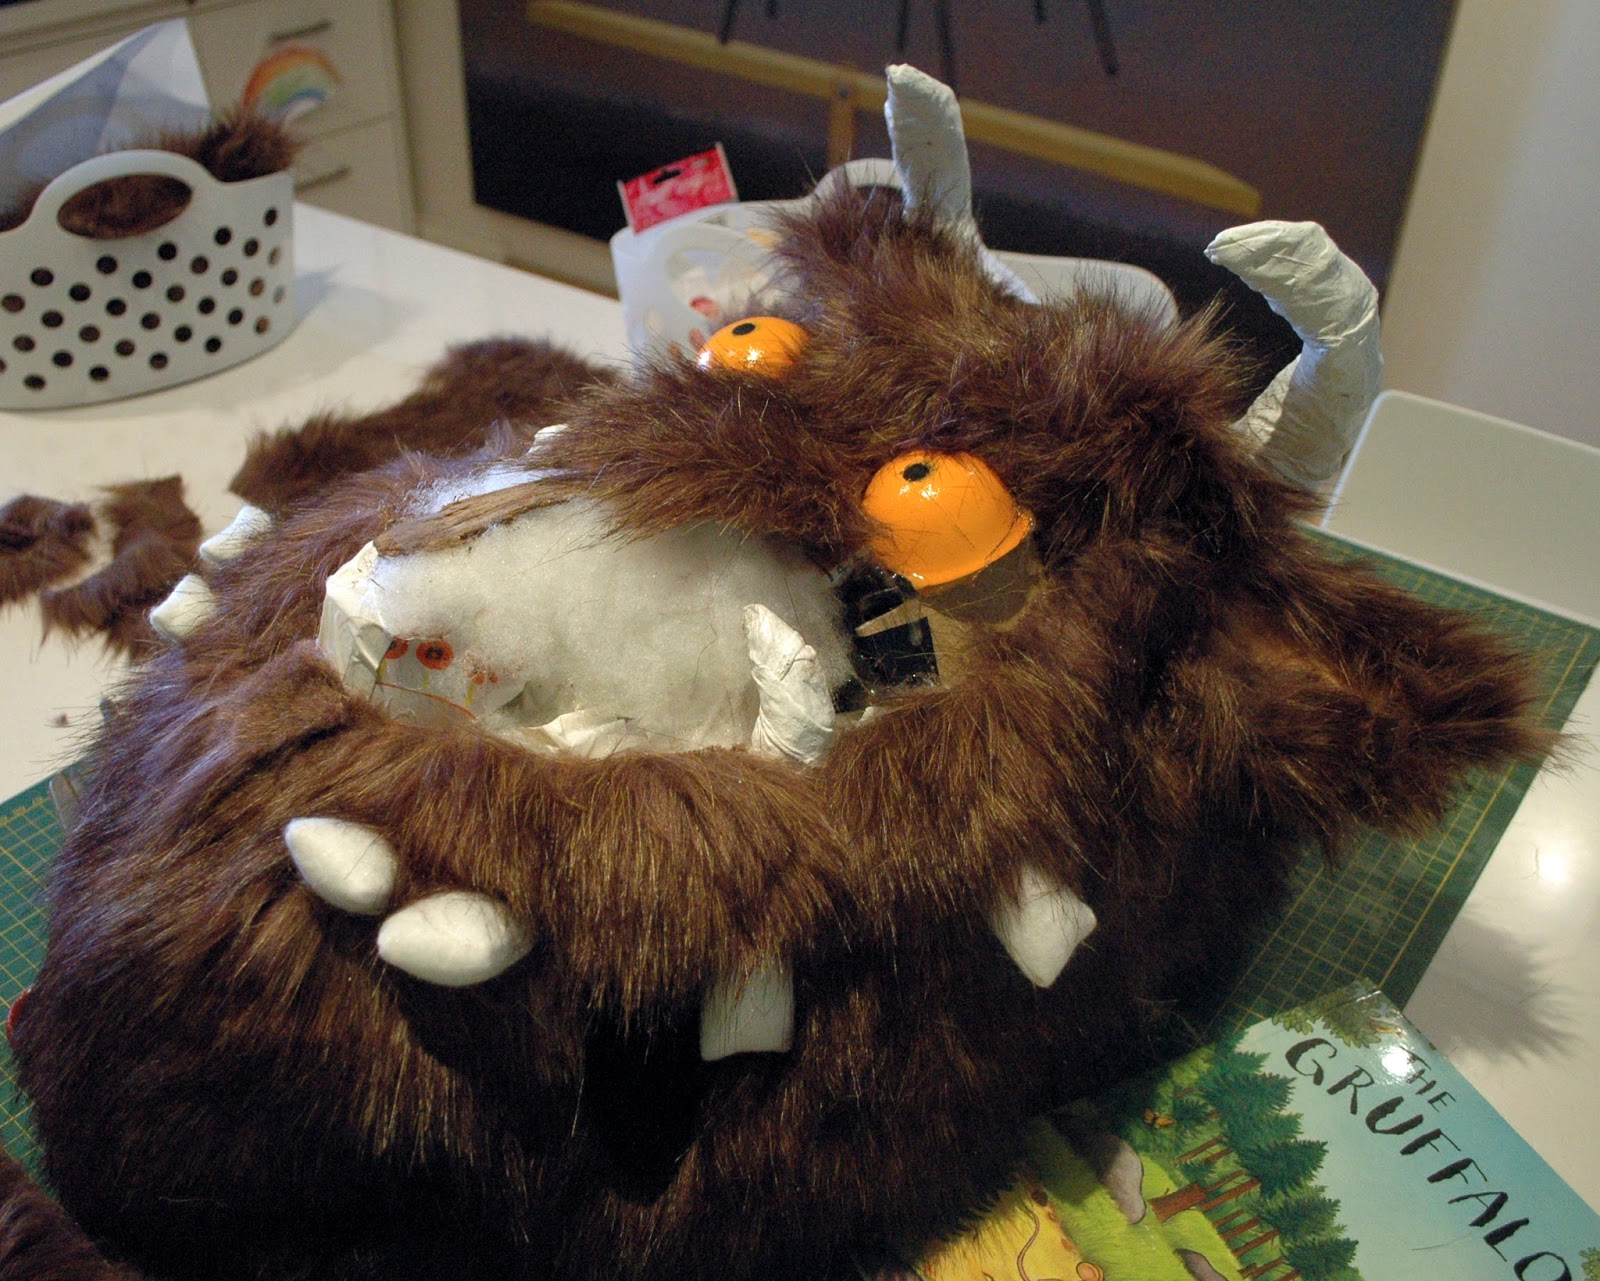
The wine carton makes up the basic form of the Gruffalo’s head. I cut along either long side to make a
bendable flap, cutting in at an angle to make the fold that makes up the eye
socket area. Gaffer tape is used to secure the final shape. You will need to cut a wide crescent shape to
form the lower mandible, again, don’t be shy with the gaffer tape. Cut from strong cardboard an insert that will
fit inside the box, including a hole to accommodate the child’s head (the
circumference around the skull). Go wild
with the gaffer tape to ensure it is firmly attached.


The ears are cut from a lighter weight card in a leaf shape,
an incision down the centre allows you to bend the card into an ear shaped
curve, gaffer into place. Cut 2 peach
felt ear inners and hot glue in place in each ear. Cut one of the foil containers in half and
twist (maybe use gloves) and mould into a smaller tusk (for near the jaw),
repeat for other side. Gaffer in
place. Use one entire foil container for
each of the tusks on the Gruffalo’s
head. Gaffer well in place. Dilute some PVA and soak strips of calico
until they are completely wet. Wind the
calico strips around the foil tusks and smooth out, let dry. Once they are dry, paint white.
Make a ball from some paper to form a nose, add some
lightweight card to give the nose some shape and gaffer in place. Use a bread knife to (carefully) cut a tennis
ball in half. Push the tennis ball
inside out to reveal the smooth interior. Paint the eyeballs white first and then in an
orange to match the illustrations in the book.
Paint the pupils in the centre black.
Once the eyes are totally dry, use the glue gun (apply liberal amounts of glue) and
attach the eyeballs in place. Take some
stuffing and use your judgement to pad out the lower jaw line, gaffer in place.
In the base, cut out a hole slightly larger than the size of
your child’s crown (the extra space is required to allow for the fur that will
line the cut edges (later on).
I used a
glue gun to stick the fur onto the mask, starting with the ears, then the base
where the fur was folded back and stuck on the inside, so the edges are fur
lined, so it is comfortable to wear. I
then worked my way up the back and around the sides, always taking into account
the nap of the fur and considering which way the fur would naturally lie, using
the illustrations of “The Gruffalo” as a guide.
Sew up some terrible teeth from white fabric, turned them
out and stuffed them lightly. I used
some very stiff interfacing to give a solid look. The teeth need to be inserted along the
bottom jaw line as you add more fur, and then into the top mandible as you
continue adding more fur.
Before the fur around the nose was glued down, I trimmed the
fur very short and sort of ‘sculpted’ nose with my scissors. I made the incisions that would allow the
pipe cleaner whiskers to be threaded through from the back to the front, and
then glued this all in place.
I painted the shortened fur in pink and let dry. The poisonous
wart was formed by gluing the hardened drips from my glue gun onto the end
of the nose. I painted the wart white
first, then pink around the edges and then finally green on the top.
For the Gruffalo ‘dress’ AND feet you will need:
Calico to make a toile test run (before cutting the fur)
Acrylic fur
White fabric
Lining fabric
Brown thread
Thimble and needle for hand stitching
A sharp blade to cut the fur
A sewing machine
Pins
Stuffing
For the Gruffalo ‘dress’
20cm of purple shiny fabric cut into triangles (about 40)
Purple thread
I took measurements of Sylvie and mocked up a toile. I ensured that there was plenty of stuffing
space to accentuate the fat guts and bottom. The arms are actually stuffed and
Sylvie’s own arms poke out from under.
 |
| At this stage, I was still considering felt paws, but that changed later on. |
Once I was happy with the toile, I unpicked it all and used
the toile to cut from the acrylic fur, being extra careful to ensure that the
correct nap was considered (making sure the fur will fall facing down on every
piece). I cut the lining out re-using the
toile pattern. Don’t ever cut fur with
scissors, use a blade and make the cuts on the back of the fur, slicing just
through the fabric that is the base of the acrylic fur. The pieces will pull apart and each edge will
have long fur.
 |
| I used a blade (very sharp) on a cutting mat. The discs are weights. |
The 40 or so purple prickles are formed by sewing along one
side of the folded triangle (right sides together), turning out and stuffing,
then sewing the base shut.
 |
| The purple prickles, yet to all turned out and stuffed. |
Once they are
all made, I made incisions in the fur all over the back and hand stitched the
prickles in place (or you can try machine stitching if you wish, but it’s kind
of bulky).
 |
| Showing the incisions on the wrong side of the fur and how the stuffed purple prickles have been stitched in by hand. |
 |
| The purple prickles from the right side. |
The tail is formed by taking a length of fur and hand
stitching the longest edges together into a tube. I then went wild with scissors and gave the
tube a ‘haircut’, quite short, but leaving one end long and hairy. I made a second shape to form the tip of the
tail by sewing a heart shaped piece of fur together and stuffing it. The two components are then joined, and the
hairy end of the tube disguises the join and makes the tail tip even fluffier. The tail is added to the back piece using the same method of attaching the purple prickles.
 |
| A photograph of the tail. |
Adding the pocket
As Sylvie is keen on bringing her own beloved Mr Mouse
dressed in a ‘Mouse’ costume to Book Week, I thought it would be a fun touch
for Mr Mouse to travel in the costume itself, and so I added a welted pocket on
the front.
For the life of me I couldn’t remember how to make a welted
pocket and a quick search resulted in one of the clearest explanations I have
ever seen. I highly recommend this
video, for beginners or a simple reminder.
I made two sets of paw claws (5 claws on the paws and 4
claws on the feet) from white fabric, turned them out and stuffed them.
Adding paw’s claws
The paws’ claws are attached to the lining. Here’s the trick:
Turn the arm lining out the right way and insert the claws,
pin in place and sew a seam across the bottom of the sleeve, right across,
following the curve of the fabric. Turn
out and the claws should neatly pop out the bottom of the lining, and the
underarm seam should be visible from the outside (keeping in mind that this is
a lining, so you want the finished side on the inside). Repeat for the second arm. In my pattern, there is a gap in the underarm
seam to allow Sylvie’s little arms to pop through. Sew the front and back lining pieces
together.
At this point, complete the lining by adding both sleeves to
the joined back and front lining pieces.
Turn the lining so that all the seams on the lining should be on the
inside. Set aside this component and
move onto fashioning the fur into a dress.
Join the fur back and the fur front together and then set in the
sleeves. I found it easier to pin the
seams, then baste in place before sewing the seam in place with the sewing
machine. I used a slightly longer stitch
than the standard 2.5. Don’t turn out
yet, leave the fur on the inside.
Adding the lining
Insert the lining into the fur dress, so the fur is on the
inside and the finished side of the lining and the fur are facing
together. Pin the neck in place and then
baste, remove the pins and make the seam to finish the neck. Turn out.
Fit the arms of the lining into the fur dress. Finish the raw edges of the “armhole” by
turning the lining under and slipstitching to the edge of the fur. Stuff the
arm on the outside edge of the sleeve.
Slipstitch the claws to the fur at the paw end of the sleeve, to the
point where the lining meets the white fabric. Repeat for the other arm.
Slip stuffing in the cavity of the back, especially around
the bottom, and also in the front. Turn
the raw edge of the lining under, pin to the bottom edge of the fur and
slipstitch closed. Dress complete!
For the Gruffalo
‘feet’ you will need:
A pair of old slipper boots
A pair of the child’s slip on style shoes (think Crocs)
White fabric for the turned-out
toes
Glue the white toes onto the front of the boot and then glue
pieces of fur to fit the boot to cover the feet. I made the length of the fur around 10cm too
tall for the boot, allowing me to turn the fur inside the boot and slipstitch
in place. Gruffalo feet complete!
Making the mouse
costume (for Mr Mouse)
Here is Mr Mouse.
He
is one of Sylvie’s most treasured toys.
He is one of the many millions of mice produced by Ikea.
He is both literally and figuratively
speaking, one in a million.
Sylvie has 3 Gosig mice, but only one of them is "Mr Mouse". The other two are known as club members...
 |
| Mr Mouse has a knot in his tail and goes about sans whiskers... |
 |
| Mr Mouse in his 'mouse' from "The Gruffalo" costume. |
 |
| Have a great Book Week dress up day Mr Mouse! xx |
Mr Mouse is
a beloved companion who Sylvie has imbued with many personality traits ranging
from very inquisitive to downright naughty.
So instead of making a
Gruffalo mouse
from scratch we would include Mr Mouse in the thrilling Book Week dress up day
by making a costume for him, knowing this would appeal to Sylvie’s high sense
of the ridiculous.
Mr Mouse will attend
Book Week with Sylvie Gruffalo, accommodated in the Mr Mouse pocket on the
front of the costume.
Ikea mouse GOSIG, $1.95, 14cm
Take a look at the gruffalo site. I only discovered this yesterday, but there is a section for 'fans' where you can send in jpegs of photographs of Gruffalo costumes you have made. I'm going to send photographs of Sylvie's and let's see if it will be posted. It was interesting to see how other parents created their child's costume, worth a look.
Sylvie wore black
stockings underneath and a singlet. I
tied her hair into a low bun. She had a
change of clothes packed in her bag in case the costume was either too hot or
too uncomfortable to wear all day.
I sent her off to
school wishing her a super fantastic best Book Week dress up day ever!