
 My brother and I differed in our approach to the
chocolate bounty that was Easter Sunday.
He was a saver. I was a scoffer.
By Sunday brunch I always felt decidedly ill as I had greedily consumed
my finds from the Easter Egg Hunt within a very short time, that is, the time
between the Egg Hunt and brunch… oh dear…
My brother and I differed in our approach to the
chocolate bounty that was Easter Sunday.
He was a saver. I was a scoffer.
By Sunday brunch I always felt decidedly ill as I had greedily consumed
my finds from the Easter Egg Hunt within a very short time, that is, the time
between the Egg Hunt and brunch… oh dear…Philip kept his stash of Easter eggs for ages and I would find him some months later in his bedroom, stoically setting up complex battle scenes with hundreds of Playmobil men and, to fuel this laborious effort, nibbling on chocolate he had set aside from Easter. I remember admiring his fortitude and regretting my impulse to devour every single egg on Easter Sunday. And making a solemn promise to myself that next year, I would be stronger.
There have been a few years where the family Egg Hunt
has failed miserably. One year, my
beautiful Russian grandmother carefully placed Easter eggs in our garden the
night prior to Easter Sunday and I think the wild animals had a feast of
chocolate that evening. We walked around
the garden in the morning with Grandma and couldn’t find one egg. Somehow I don’t remember being very upset
about it, more fascinated that all the eggs had disappeared. Completely.
No foil remains. Nothing. I had an image of a very fat possum sitting
on a branch with his chocolate plunder carefully stacked in a handy fork of a
nearby limb, peeling the foil off each egg, shoving the chocolate into his
mouth with one paw and dropping the foil with the other, releasing the wrapping
to float to the ground like an Autumn leaf.
I was sure that if I looked around enough I would find a big Eucalypt
with the foil husks of the stolen Easter eggs gathered at the base of the tree.
Over the years we have become more canny and now the
Easter Egg Hunt I arrange for my little girl takes into account the local
wildlife’s predilection for pretty foil-wrapped chocolate eggs and I tip toe
outside in the early hours of Easter Sunday like Easter Bunny himself, except I
have no ears or tail and I’m wearing a nightie and gumboots. (And I don’t hop of course).
The resident corvidae (our family of crows) watch me
with a keen eye and I dash back to the cottage and yell out “he’s been, the
Easter bunny has visited” and we have to rush into the little forest and begin
the hunt straight away or Mr and Mrs Crow and their progeny will expertly
extricate the chocolate from the foil and make away with all the unnaturally
sweet and energy giving chocolate eggs, teasingly leaving the foil behind.
As an adult I’m not so wild about chocolate now, but
the pretty foil coverings do have me enchanted and I’m an avid decorator of the
Easter Sunday table. So, to that end, I
have designed a simple Easter Bunny to use as a decoration on your Easter table,
using plastic milk bottles and a few things that you should be able to find
about the house. You’ll just need to
download the PDF of the pattern, print it out and begin collecting your milk
bottles. Written instructions are
provided below.
Please visit this blog again as there are more Easter
themed blogs to be published quite soon.
Best,
Lara Jane.
Instructions to make the Milk Bottle Easter Bunny

One standard (Australian) 2 litre milk container makes
one Milk Bottle Easter Bunny. So if you
would like a table full of Milk Bottle Easter Bunnies, start collecting milk
bottles now! Once you have made your
first Milk Bottle Easter Bunnies you will see they are quite quick to whizz up,
so a dozen could easily be fashioned in an hour or so.
Click on the link below to a shared 'Milk Bottle Easter Bunny pdf pattern' (check that you size the pattern to 12cm wide x 15cm high) then print out on a sheet of A4 plain paper.
Milk Bottle Easter Bunny pdf Pattern
What you will need to make one Milk Bottle Easter
Bunny
adhesive dissolving liquid (I use ‘de-solv-it’)
rubber gloves
hot water
detergent
sharp scissors
an empty 2 litre milk bottle (no lid required)
downloaded PDF pattern printed onto plain paper
a piece of light cardboard (think cereal box)
glue stick
a sharpie
texta for tracing
a few sheets
of kitchen paper to remove the tracing marks made by the Sharpie
a small blob of blu-tack
standard single hole-punch
small single hole-punch
a pretty foil wrapped chocolate Easter egg!
Preparing the milk bottle
Firstly wash the milk bottle out thoroughly using
detergent. Fill the milk bottle with
very hot water and wait a few moments.
The heat from the hot water will allow you to peel off the labels. Remove the labels and discard. Tip out the water and spray ‘de-solv-it’ onto
the remaining sticky residue. Use your
gloves to rub the ‘de-solv-it’ well over the sticky areas. Use a little detergent to dissolve everything
and rinse clean.
Cut through the top part of the bottle and down one
side to the base ridge. Cut around the
‘square’ of the base following the ridgeline.
Discard the base cut-off. Cut off
and discard the top part of the bottle following the upper ridgeline (cut above
the line). A long rectangle of plastic
should remain.
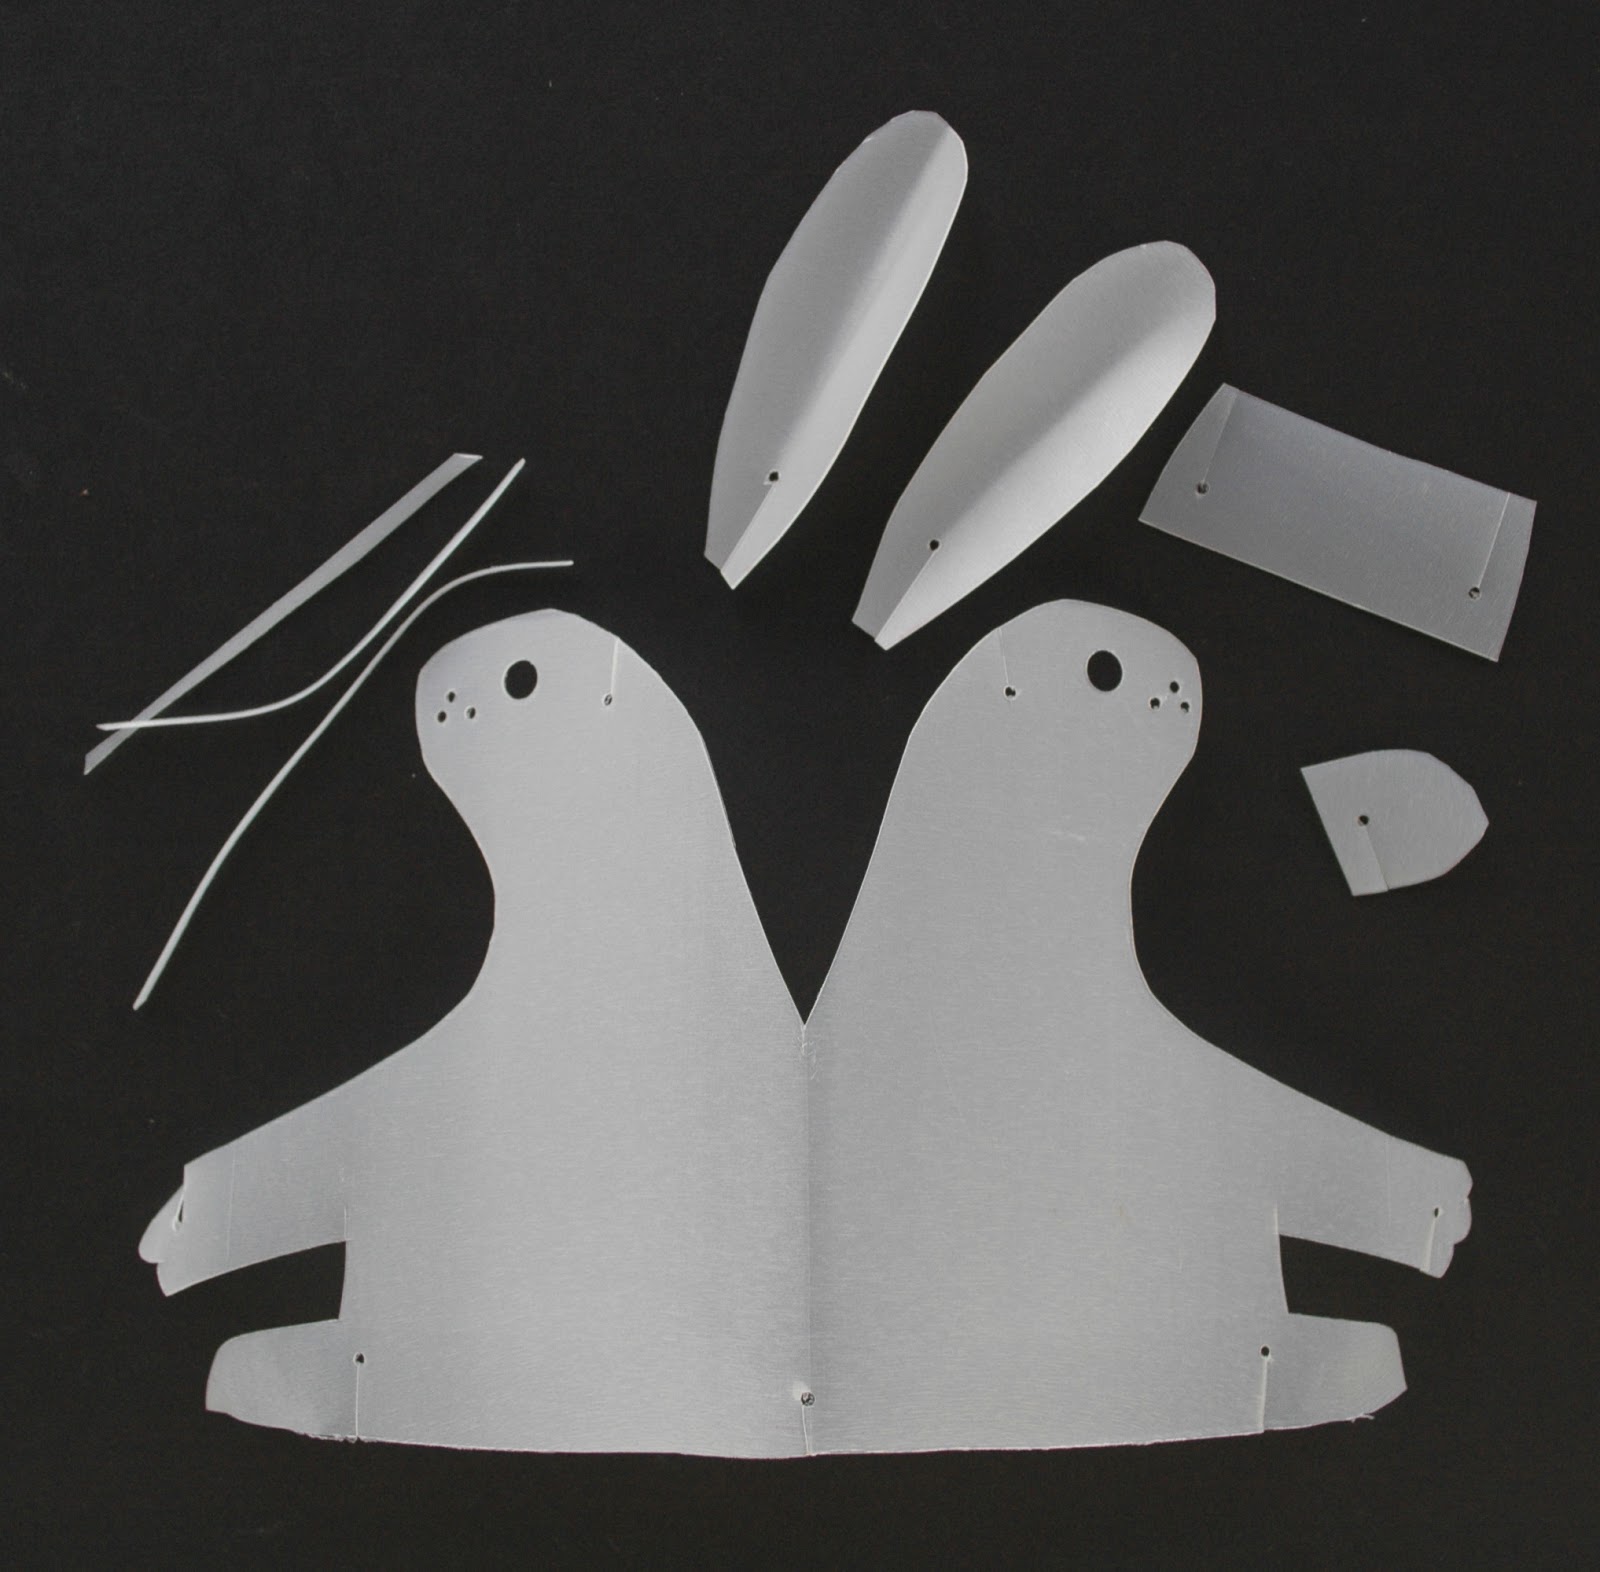
Preparing the pattern
Download and print out the PDF pattern provided. Stick your paper pattern onto the cardboard
using the glue stick. Cut out the
pattern. Punch the holes shown on the
pattern into the cardboard pattern using the appropriate sized hole-punch (i.e.
only the eye uses the large punch, the rest are small).

Cutting out the Milk Bottle Easter Bunny
Place the
plastic in front of you lengthways and notice the 3 bends that were the corners
of the container.
Fold the plastic in half on the centre bend and rub your thumb
down the fold to flatten it out some more.
Line up the base of the cardboard pattern with the bottom ridgeline of
the plastic and place the spine of the bunny on the fold you made. Pop a little blu-tack under the pattern to
help hold it in place while you trace around the perimeter using the Sharpie
texta, remembering to mark the hole-punch positions by pushing the tip of the sharpie
through each hole.

Remove the
blu-tack from between the pattern and the plastic and re-stick it between the
folds of plastic. Assuming you are
right-handed, once all the marks have been made, set the pattern aside, hold
the folded plastic firmly in your left hand and cut out the bunny body. Before you unfold the bunny body, hole-punch
through both layers where indicated, except the small hole on the spine. Once
you have done this, you can open out the bunny body. Hole-punch on the fold of the spine at the
mark (this will eventually hold the tail piece).
Cut all the
incision marks (shown in orange on the pattern) from the outer edge to the
hole-punch point. The left paw should
have an incision made from the bottom of the paw up to the hole-punch and the
right paw should be cut from the top of the paw down to the hole-punch and so
the orange marks have been omitted from the pattern to avoid confusion.
Make up the
remaining pieces (inner base support, tail and ears) by tracing the shapes out
onto the plastic, cutting them out, hole-punching where indicated and cutting
the incisions as per the pattern. You
might like to use a tiny piece of blu-tack between the pattern and the plastic
to help you keep the pattern in place while tracing. You will need two ears, so trace one ear,
mark it and then flip the pattern over and repeat for the second ear. Make the holes and incisions as per the other
pieces.

Spray each
piece with a little “de-solv-it” to remove any Sharpie texta marks before you construct
the rabbit. Check every punched hole and
remove any tags remaining from the hole punch.
Constructing your Milk Bottle Easter Bunny
Link the paws together by slipping the incisions
together. Slip the inner base support up
into the incisions in the bunny’s legs. Slip
the tail in place at the back.

You’re almost done; now you need the whiskers
Cut 3 strips of plastic into 6cm lengths, the width
being just a little wider than the diameter of the small holes made in the bunny’s
nose. These are the whiskers and it is
important that the width of the whiskers is just a tad wider than the holes as
when the whisker is fed through both layers it holds the bunny’s head together. You might need to cut a few to get the
perfect size. Pinch the bunny’s head
together at the nose and thread the whiskers through both holes through both
layers. It helps if you cut the ends of
the whiskers to a point. The width of the whisker is correct if you need to tug
the strip through the hole a little.
This will hold the head in place.
And finally the ears
Fold the ears vertically to make a nice rabbit ear
shape and slip each ear into the incisions on the bunny’s head (one on each
side). The ears will sit naturally at a
jaunty angle once the whiskers are complete.
Trim the whiskers to the length you find pleasing.

You can alter the rabbit’s ability to hold different
sizes of chocolate foil covered egg to some degree by experimenting with
lengthening or shortening the arms to fit.
Pop a pretty Easter egg in the bunny’s arms and your
Milk Bottle Easter Bunny is ready to decorate your Easter table!
